Since the Macbook Air was first presented at Macworld '08, we have had several people telling us that we should write about it. In particular, how Xslimmer is an ideal tool for it due to the small hard drive sizes. Faced with this kind of proposal, the question becomes what to exactly point out that it is not totally obvious. Xslimmer is a product to recover disk space from applications. The Macbook Air has a small hard drive. What else? As I do not know, I leave it there and point to you to some other people's articles:
* http://www.isights.org/2008/02/free-disk-space.html
* http://www.macrumors.com/2008/01/31/unboxing-video-of-macbook-air-more-notes/
Enjoy!
Latenitesoft: Mac & iOS Applications. Our blog.
Friday, February 29, 2008
Colors in Sketches
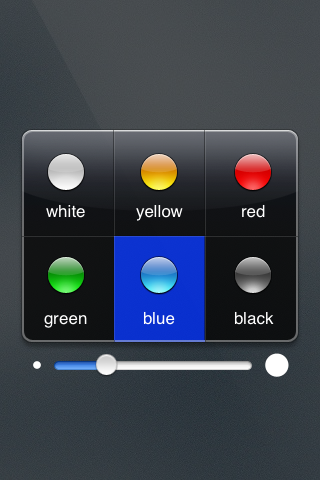
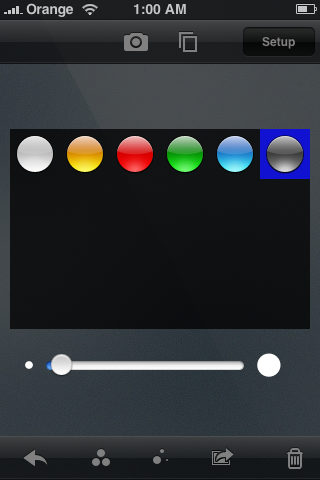
We knew it had to come. With only 6 colors in Sketches 0.5 and older, we had several requests to add more. Some were really specific, "please add brown", some were more generic, "a few more colors would be nice". With our passion to do things as simple as possible for our users, this was no easy task. The current color picker was easy to understand and nice:
We looked at a good number of existing color pickers in different systems. From Hue, Saturation and Lighting circles to the Mac crayons, all had advantages and disadvantages. The HSL circles provide a great range of colors, but it is hard to select the same color twice, plus, not all people understand it well. Other pickers were not too suited for the iPhone/iPod touch interface.
We finally decided to evolve our current color picker, adding more colors, for a total of 24, getting rid of the text and giving it a different aspect:
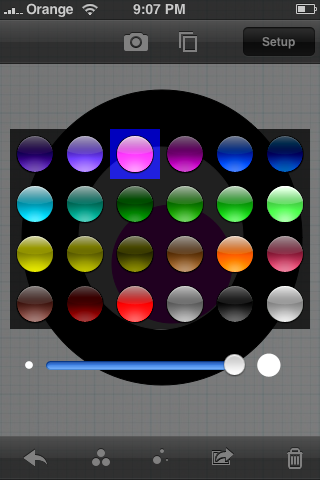
After several tries, this was the final result:
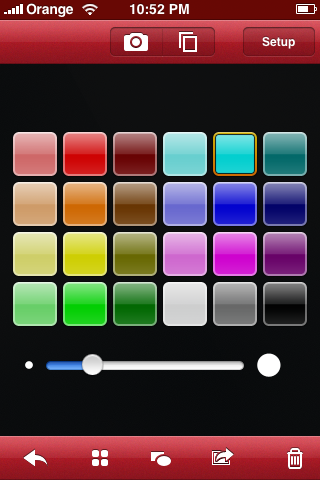
We hope you like it!
We looked at a good number of existing color pickers in different systems. From Hue, Saturation and Lighting circles to the Mac crayons, all had advantages and disadvantages. The HSL circles provide a great range of colors, but it is hard to select the same color twice, plus, not all people understand it well. Other pickers were not too suited for the iPhone/iPod touch interface.
We finally decided to evolve our current color picker, adding more colors, for a total of 24, getting rid of the text and giving it a different aspect:
After several tries, this was the final result:
We hope you like it!
Wednesday, February 27, 2008
iPhone programming tips: image orientation
One of our main focus when we started to write Sketches was to leverage as much as possible the existing technologies already available in the iPhone. This is not a new idea: just as all Mac OS X apps cooperate with each other, we thought that integrating Sketches with the rest of apps in the system would make it a far more fun and pleasing app.
Given the complete lack of documentation or experience, trying to figure out how the APIs work and fit together with each other was no easy endeavor. However, we bravely set out to study the Cocoa iPhone APIs, armed with our previous knowledge of desktop Cocoa, and a lot of patience. Sometimes we thought the effort might be overkill, but being perfectionists at heart, we were uneasy to deliver something that we ourselves considered suboptimal. We are satisfied with many of the results we got, and people seem to appreciate them too. In fact, we've had several fellow coders ask us about details in our image handling code, or how we manage to send emails from Sketches without actually launching MobileMail.
One of the areas we are frequently asked about is the way we handle images shot from the camera or picked from the photo album, and how we detect their orientation. Instead of answering the questions privately, we thought it could be interesting for others to post them here. Maybe our explanations will become outdated next week after The Event - if so, that'd be great news for all :)
In the following paragraphs I'll try to describe some of the interesting "features" I found when guessing how to use the Camera and Photo Album APIs, with a special focus on detecting orientation. I may be utterly wrong in my interpretations, but so far they have been working reasonably well for Sketches :)
* Warning: technical burble ahead *
The first idea that comes to mind if you want to have the camera shoot pictures and use them in your app, is to use the cameraController:tookPicture:withPreview:jpegData:imageProperties callback invoked by the CameraController class. It looks promising, but after some experimentation, we found this approach was not as flexible as we required. Instead, we are using a different mechanism in Sketches. We subscribe to the CameraImageFullSizeImageReadyNotification event, which is sent just after a new photo has been taken. Early in our development we decided to subscribe to all notifications and log them in a file, a simple technique that was instrumental to learn about the existence of this particular notification. In our code, the method that receives the notification is similar to the following:
The important piece of information here is that the "object" property of the notification contains an instance of the CameraImage class, which belongs to the PhotoLibrary API framework. In a moment we'll show how to deal with CameraImage instances.
For photos picked with the photo album browser, we use the PLUIController class. A line like
will trigger selection of a photo from the photo album. If you set a delegate object, the photo album will invoke your delegate's imageWasSelected method, indicating as a parameter the CameraImage instance that corresponds to the image selected. Note we are using the shared PLUIController instance and do not instantiate a copy ourselves - results are more difficult to achieve the other way around, because the constructor of the shared object actually knows how the instance has to be instantiated, while we have no idea about the properties we should set to make it work.
Therefore, for both types of photo selection (shooting with the camera or selecting a photo from the photo album), we end up with a CameraImage instance to deal with. A CGImage can be created from the CameraImage, using the following API call:
Now we have a Core Graphics image, which is a good thing because there's actually a whole lot of documentation about that.
However, this is where things get a bit hairy regarding how to determine image orientation.
First of all, there are three different sets of values that refer to orientation characteristics:
- If you copy photos from your iPhone to your computer and look at them in an EXIF browser, you'll see that they contain one of the following values: "1" for "normal" images; "3" for images that are rotated 180 degrees; "6" for images that are rotated 90 degrees; and "8" for images that are rotated 90 degrees counter-clockwise.
- The orientation value returned in the integer above does not correspond to the EXIF values just mentioned. The values returned by createFullScreenCGImageRef are, respectively: "1", "2", "3", "4". To make things amusing, images shot with your phone in the vertical upright position will typically be stored to disk with a 90 degrees CCW rotation; therefore, the orientation value you'll receive if you pick such a photo from the photo album will be "4".
- Third, the device orientation, as reported by UIHardware, uses a different set of values. They are the following: "1" (phone vertical, upright position); "2" (phone upside down); "3" (phone rotated 90 degrees CCW with respect to the vertical position); "4" (phone rotated 90 degrees CW).
Therefore, after you select a photo from the photo library, you should check the orientation value you get when creating the CGImage reference, and then you have to correct the rotation using the rotation and translation transformations provided by the CoreGraphics API.
For photos shot with the camera, however, the orientation value returned by createFullScreenCGImageRef at that particular callback is always "4", no matter what the device orientation is, or the way the photo is stored in the disk. This probably happens because my initialization of the camera related APIs is possibly incomplete, but I haven't figured out how to achieve a better result. For shots, therefore, what we do is use the device orientation value, then rotate the photos according to the description above.
Another option I tried was to open the physical files that refer to the CameraImage and read their properties. I was hoping to get the EXIF orientation value, but it seems that at this stage not many properties are available. In fact, code like the following yields a dictionary with just a "FileSize" property:
We are using these techniques in the current version of Sketches, and will also be the basis for some new features we are still cooking up. We hope they are useful to other iPhone programmers too!
Given the complete lack of documentation or experience, trying to figure out how the APIs work and fit together with each other was no easy endeavor. However, we bravely set out to study the Cocoa iPhone APIs, armed with our previous knowledge of desktop Cocoa, and a lot of patience. Sometimes we thought the effort might be overkill, but being perfectionists at heart, we were uneasy to deliver something that we ourselves considered suboptimal. We are satisfied with many of the results we got, and people seem to appreciate them too. In fact, we've had several fellow coders ask us about details in our image handling code, or how we manage to send emails from Sketches without actually launching MobileMail.
One of the areas we are frequently asked about is the way we handle images shot from the camera or picked from the photo album, and how we detect their orientation. Instead of answering the questions privately, we thought it could be interesting for others to post them here. Maybe our explanations will become outdated next week after The Event - if so, that'd be great news for all :)
In the following paragraphs I'll try to describe some of the interesting "features" I found when guessing how to use the Camera and Photo Album APIs, with a special focus on detecting orientation. I may be utterly wrong in my interpretations, but so far they have been working reasonably well for Sketches :)
* Warning: technical burble ahead *
The first idea that comes to mind if you want to have the camera shoot pictures and use them in your app, is to use the cameraController:tookPicture:withPreview:jpegData:imageProperties callback invoked by the CameraController class. It looks promising, but after some experimentation, we found this approach was not as flexible as we required. Instead, we are using a different mechanism in Sketches. We subscribe to the CameraImageFullSizeImageReadyNotification event, which is sent just after a new photo has been taken. Early in our development we decided to subscribe to all notifications and log them in a file, a simple technique that was instrumental to learn about the existence of this particular notification. In our code, the method that receives the notification is similar to the following:
- (void) cameraImageFullSizeImageReadyNotificationObserver: (NSNotification *) notification
{
    NSLog( @"cameraImageFullSizeImageReadyNotificationObserver" );
    [cc stopPreview];
    CameraImage * cameraImage = (CameraImage *) [notification object];
    if ( cameraObserver && [cameraObserver respondsToSelector: @selector(imageWasSelected:)] )
    {
        [cameraObserver performSelector: @selector(imageWasSelected:) withObject: cameraImage];
    }
}
The important piece of information here is that the "object" property of the notification contains an instance of the CameraImage class, which belongs to the PhotoLibrary API framework. In a moment we'll show how to deal with CameraImage instances.
For photos picked with the photo album browser, we use the PLUIController class. A line like
[[PLUIController sharedInstance] setDisplayingPhotoPicker: YES];
will trigger selection of a photo from the photo album. If you set a delegate object, the photo album will invoke your delegate's imageWasSelected method, indicating as a parameter the CameraImage instance that corresponds to the image selected. Note we are using the shared PLUIController instance and do not instantiate a copy ourselves - results are more difficult to achieve the other way around, because the constructor of the shared object actually knows how the instance has to be instantiated, while we have no idea about the properties we should set to make it work.
Therefore, for both types of photo selection (shooting with the camera or selecting a photo from the photo album), we end up with a CameraImage instance to deal with. A CGImage can be created from the CameraImage, using the following API call:
int orientation;
struct CGImage * cgimage = [image createFullScreenCGImageRef: &orientation];
Now we have a Core Graphics image, which is a good thing because there's actually a whole lot of documentation about that.
However, this is where things get a bit hairy regarding how to determine image orientation.
First of all, there are three different sets of values that refer to orientation characteristics:
- If you copy photos from your iPhone to your computer and look at them in an EXIF browser, you'll see that they contain one of the following values: "1" for "normal" images; "3" for images that are rotated 180 degrees; "6" for images that are rotated 90 degrees; and "8" for images that are rotated 90 degrees counter-clockwise.
- The orientation value returned in the integer above does not correspond to the EXIF values just mentioned. The values returned by createFullScreenCGImageRef are, respectively: "1", "2", "3", "4". To make things amusing, images shot with your phone in the vertical upright position will typically be stored to disk with a 90 degrees CCW rotation; therefore, the orientation value you'll receive if you pick such a photo from the photo album will be "4".
- Third, the device orientation, as reported by UIHardware, uses a different set of values. They are the following: "1" (phone vertical, upright position); "2" (phone upside down); "3" (phone rotated 90 degrees CCW with respect to the vertical position); "4" (phone rotated 90 degrees CW).
Therefore, after you select a photo from the photo library, you should check the orientation value you get when creating the CGImage reference, and then you have to correct the rotation using the rotation and translation transformations provided by the CoreGraphics API.
For photos shot with the camera, however, the orientation value returned by createFullScreenCGImageRef at that particular callback is always "4", no matter what the device orientation is, or the way the photo is stored in the disk. This probably happens because my initialization of the camera related APIs is possibly incomplete, but I haven't figured out how to achieve a better result. For shots, therefore, what we do is use the device orientation value, then rotate the photos according to the description above.
Another option I tried was to open the physical files that refer to the CameraImage and read their properties. I was hoping to get the EXIF orientation value, but it seems that at this stage not many properties are available. In fact, code like the following yields a dictionary with just a "FileSize" property:
NSString * imgPath = [[image fileGroup] pathForFullSizeImage];
CGImageSourceRef imageSource = CGImageSourceCreateWithURL( (CFURLRef) [NSURL fileURLWithPath: imgPath], NULL );
NSDictionary * imageProps = (NSDictionary *) CGImageSourceCopyProperties( imageSource, NULL );
We are using these techniques in the current version of Sketches, and will also be the basis for some new features we are still cooking up. We hope they are useful to other iPhone programmers too!
Friday, February 08, 2008
More iPhone Drawing Fun: Sketches 0.5 beta released
Sketches 0.5 beta has just been released, it should be available soon via Installer.app.
The biggest feature is support for multitouch drawing, making it possible to easily draw shapes such as ovals, rectangles, lines or arrows. Multitouch has been integrated with the "single-touch" mechanism in previous versions: you can use two fingers to create a shape, or just one to continue drawing free style, just like you were used to.

Sketches 0.5 is compatible with iPhone and iPod Touch devices running firmware versions 1.1.1 through 1.1.3, adapting to platform specificities automatically. The bug that caused only one photo to be exported to your photo album has been fixed, and sending sketches via email has been made a bit more user-friendly by providing visual progress indications.
More details about these new features and other improvements are available in these iPhone-ready release notes.
We hope you like this release!
Saturday, February 02, 2008
Xslimmer 1.5 is Out!
It has taken us more than expected, but Xslimmer 1.5 is finally out.
Initially we intended to release this version along with Leopard, but we changed our strategy along the way. Feedback received from our testers and some difficulties in getting localizations recommended to dedicate some more time to this version. At the same time, we did not want to delay full Leopard compatibility, so we decided to add Leopard functionalities (code signing support, time machine exclusion, and others) to the 1.2 development line, while continuing to work on 1.5 at the same time.
Shortly after our initial Leopard-compatibility release we started to work on the preparation of the Christmas promotions we chose to take part in: MacUpdate bundle, and MacHeist II (as a loot for Mission 4). They both have been a success, and we have managed to get Xslimmer into the hands of many more customers.
The wait is now over. Thanks very much to all testers and to all our customers for your patience. We hope you enjoy this release, and that you see a lot of your suggestions covered by it.
Subscribe to:
Posts (Atom)